Ergonomic Mouse - Part One
Experiments With Creating a Better Mousing Experience
Page created 12th October, 2009
Ergonomic steampunk rollerbar mouse
RSI is a pain in the neck...
... and the hand, and arm, and shoulder.... As much as I love the many advantages I get from a computer, there is a very nasty downside - RSI - repetitive strain injury. It is agonising, debilitating, and a waste of time. And a waste of money, if you make a living with your computer. After a particularly bad flare-up a couple of years ago I splashed out on the ergonomic Perific mouse .
Mini review of the Perific mouse
The Perific mouse is a brilliant concept, but poorly executed. Despite being a vast improvement, it is far from perfect. Using it on the desk in the traditional way it still forces your arm into an awkward position, stretched out and twisted. At least you can vary position and hold the mouse on either hand, which makes it also easier to relax back in the chair, even recline. However, held in the hand, use is somewhat restricted by poor button placement, and shape, too much click resistance, and a relatively slow cursor sweep with the trackball, and despite being able to type with the mouse on your hand, it is rather clunky and slow. The Perific ain't terrific, but OK for limited use.
Surely, there must be a better mouse out there
I trawled the net for ergonomic pointing devices, but there was no one product which could do all the things I needed from it, or at least not at a price which did not necessitate taking out a mortgage. I need a device which allows for tight control in graphics applications, and a device which allows quick darting about when surfing web pages - jumping from links to bookmarks to address bar or form fields for typing. A reasonably large trackball is great for tight control, pixel by pixel (a pen may also serve well there), and if positioned in such a way that one can use it without holding the whole mouse, it would even be tolerable for sweeping movements, but none of the models would suit my needs fully. Ideally, it would all be tightly packaged with the keyboard to minimise arm stretch, or small or narrow enough to be placed in front of the keyboard.
One of the most suitable devices I found was the track-bar type mouse. Although it came with a hefty price tag, it looked like a device I could cobble together myself with bits and bobs I had around the house.
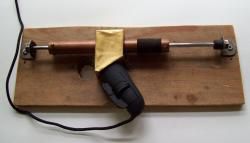
Home made version of a track-bar mouse - no soldering required
This is not a full how-to article, but more a proof of concept with some basic principles and pointers, but it should not be too difficult to come up with your own version. It also assumes basic DIY skills.
So, how does a track-bar mouse work? If you think of a mouse mat wrapped into a roll and slid and rolled in front of the optical sensor of a mouse, you've got a track-bar mouse. Well, the principle anyway. The surface and the sensor move relative to each other on the X-Y axis. You can use a track-bar mouse with two hands. This may seem odd, because we are so used to the conventional mouse, but it is a lot more comfortable to use. It takes very little time to get the hang of it. This mouse is typically placed in front of the keyboard, so you don't have to reach, and your hands are already close by. You could also place it on your lap. Check out this brief video to see how it moves.
If you have a suitable donor mouse, and you can position the sensor in such a way that you can rig up a sliding bar facing it, you don't even have to do any soldering. The finger mouse I used was ideal for the job. Apart from being very cheap, it was small, and the optical sensor was mounted on a tiny separate circuit board which was connected to the rest of the innards with a short length of cable. This meant I could remove it from the housing and rig it up in front of the bar in such a way that I didn't need to unsolder anything, and I could fix the body of the mouse at an angle which makes clicking the buttons easier. If you want to use the same mouse I used, you can get it through eBay for a few dollars or pounds, even with postage, from Hong Kong. Search for finger mouse - loads should come up. Prices do vary, so shop around.
Design considerations
Donor mouse
- must be optical, laser may also work
- the smaller, the better
- use type intended for moving over a surface, i.e. not trackball - the cursor will move the wrong way on one of the axis if used on a bar
- if a normal desktop mouse is used, the mouse will have to bridge the bar facing front to back and the buttons have to be re-programmed to work in reverse, or your brain has to work in reverse
- when positioning the optical unit, test cursor direction to check it is moving the right way relative to moving the bar
Bar
- length should be approximately the length of cursor travel from screen edge to edge, plus an area long enough for your fingers to roll it, plus a little extra for any caps or holders if used
- diameter should not be too thin, as the surface area in proximity of the sensor will be smaller, and more liable to loose contact, unless all parts are precision engineered and accurately positioned
- the diameter should not be too large as the height of the device could get too big to reach the keyboard
- about 15mm or half an inch is about right for a home made device
- surface must not be totally plain as the sensor is a tiny camera which photographs the surface at high frame rate, and calculates the different position by "seeing" a difference in the picture it took from the previous one
- if using metal pipe, roughen the surface slightly - this will give a fine pattern for the camera to see
- wrapping a piece of leather or cloth around the bar end which is touched will help traction
- can be pipe on a rod, or solid bar on bearing points
- keep the area in contact with the supporting rod as small as possible for smooth running
- the holes at the end of the bar must be central and as small as they can be without rubbing (no slack allowed)
Support rod
- must be absolutely straight
- must be smooth
- length is the length of the bar plus the full travel of the bar past the sensor on each side
More details can be gleaned from the photos.
Verdict
In principle the design works well, but due to the lack of precision tools the mouse does not work perfectly. It was difficult to place the bearings perfectly in the centre of the pipe, and the smaller bits of pipe are still a little slack, yet the pipe does not run freely as the rod is not absolutely straight.
One question which comes up about this design is, what happens when the cursor comes to the edge of the screen and you are running out of bar? With a conventional mouse you pick it up and reposition it. This is not possible with the piston type track-bar. A commercial version has a switch at the end which virtually repositions the cursor, but that would be beyond the average DIYer. I got around that problem to a large extent by firstly creating the bar the length equal to the cursor's travel on the screen. That is fine if you start of with the cursor in the right position, it lets you move for a while before you run out of space, but you will have to reposition eventually. I also plugged in a standard desk mouse, as two mice can happily coexist, as long as you only operate one at a time. When I eventually run out of space, I just pick up the desk mouse to reposition the cursor. Simple enough.
This particular version did not work well enough to keep it as it is. I have an idea, which will probably work much better, and should be easier to produce, so when I get around to it, I will make one to post up here. That still leaves me without a decent ergonomic mouse in the meantime. So I cheated, as I just got the opportunity to buy one of those fancy commercial versions with a grant due to my RSI problems. It does however mean another review coming up as well, so stay tuned. If you have not subscribed to my updates already (free, of course), click the email or feed button after the photos to subscribe and you will be automatically notified of any updates. In part two there will also be one more write-up on another mouse experiment I've already done, and some more information on saving your arms and hands.
Update
Matt, a reader of this blog, has pointed to a great piece of Windows software called SakasaMouse which can individually change the X and Y axis for your mouse. It was designed as a prank, but works for this purpose very well. It is tiny - only 12.67kb and free. I tried it, and it works and I had no problems with it. Thanks again, Matt.
Update 2021
Not long after I wrote the article my computer gave up and I bought a Macbook Pro with an amazing trackpad which stopped my RSI. This meant I no longer required a mouse. I don't know if I'll ever go back to using one again, so there won't be an update on any home-brew ergonomic mouse or review for the foreseeable future, sorry. What I can say, though, is that a trackpad with smooth operation and gesture support is a game changer. My experience with trackpads so far has only been with the awful ones on laptops I used up to 2010 and the fabulous Macbook Pro one. However, I believe that laptop trackpads have come a long way since I last used the old type and it's worth checking out if there is some external equivalent for non-Mac desktop computers. Apple do make an external track pad for use with desktops, but check if they are compatible with other computers. The main downside to the Apple external trackpad is the size. It is somewhat larger than the inbuilt laptop one, which extends the reach to the keyboard if placed in front, or creates a similar RSI problem to a mouse if placed to one side.
Click thumbnails to enlarge, click popup to close
Donor mouse
Inside the mouse
Track-bar mouse without the sensor shield
Mouse held with screw and Polymorph spacer
Bearing made of pipe & Polymorph,
sensor head held with hot glue
Buttons positioned for natural finger position
Related Articles

Free creativity guide to help you solve problems and design anything.