Some Binding Methods
Page created 8th April, 2007, updated 15th June 2011
The above methods are suitable for many binding situations, but in particular for the printable foraging guide.
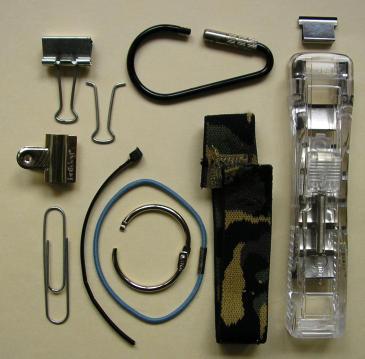
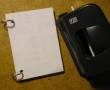
From top right, clockwise:
- karabiner - this one was part of a little pocket knife, and has a screw post closure
- elastic strap with velcro
- fabric covered hair elastic
- locking binder ring (inside elastic)
- cable tie
- Bulldog clip
- binder clip
The Bulldog clip may be a little too bulky, and the protrusions could get snagged in a pocket and drag the clip off the guide. For home use it may be a quick and easy solution.
The binder clip may be the best of these solutions. It is easy to obtain, cheap, comes in many different sizes, even colours, holds the pages very securely, and the folding handles can be removed so they don't get in the way. It is best to print out the guide and cut the pages to see how thick it is before buying the binder clips to ensure best fit.
Another solution would be to use a small two-ring binder, or cut down a larger one to fit. This may be a little bulky for outdoor use. You could also try making a DCMC binder from milk cartons and cereal box, or simply put the loose pages in a pouch. There are wallets for index cards which may fit your guide.
The DCMC Binding System
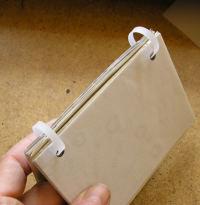
Notebook made with the dcmc binding system
The Dirt Cheap Milk Container binding system is, well, dirt cheap, is made with milk containers, and only came into existence today. As with so many of my tinkering projects, the idea was born out of necessity. A little while back I became enamoured by the Circa and Rollabind binding system, or it's European counterpart Atoma and ADOC . At first I asked the same question I have heard being asked since - what is it with these discs? The answer was in Douglas Johnston's post Review: The Levenger Circa System, Part I on the DIY Planner website. The disc binding system is very versatile.
Lets look at some of the key advantages:
- add or remove pages
- the book can lie open
- 360 degree turning
- mix and match different sizes of paper in same book
- customize to your heart's content with a punch
You can add and remove pages and customize ring binders, and they will lie open flat, however, you can not fold the pages back. This, and the binding mechanism makes ring binders clunky items. Even if you have a humongous desk (i.e. about 1/10 of a football pitch), the most valuable space is within arm's length, so every inch counts. When you get down to about A7 size, the mechanism makes the binder unnecessarily large, and a standard two ring binder will not accept paper smaller than A7. The one inch spacing on the disc system allows business cards to be punched on the short side. There are small speciality ring binders sold as planners, which can take smaller paper, but the binder size is usually some custom size, and so is the hole arrangement, making the purchase of an expensive punch necessary, and the cutting of paper wasteful.
Wire bound (spiral or twin wire) have the advantage of lying flat, and turning 360 degrees, however, you are stuck with the book you bought, and can not move paper around. A spiral can be threaded in and out, but this is more than tedious. Comb binding is somewhat more flexible, but does not easily turn back on itself, and has the habit of opening up and even braking. The punch and binding machine is a hefty item.
Then there are treasury tags and screw posts, binder rings and bits of string, staples or glue, all of which have plenty of disadvantages as a serious flexible binding mechanism for a planner, notebook, project binder, contact book or whatever else you wish to custom make.
With the disc system you can make any size, any type of book you choose, fill it with your own printed templates, blank paper, ruled, unruled, pockets, fancy paper, anything. There are several sizes of discs to choose from, so you can make a dinky little pocket pad, or a thick year planner with all your contacts under one cover. But there is a sting in the tail.
The disc system requires a special punch, which is not cheap, especially if you live outside of the US. That is the point at which doubt began to creep in. By the time I had bought the punch and a few packets of discs, I would not have had too much change from £100. But I liked the idea, and so I began to ponder the DIY route, which, I am pleased to say, has led me to a binding system with all the above advantages, and one I (and probably most of you) could get started with straight away. It requires few tools and materials (even recycles materials) to make the binding mechanism, and uses a standard two-hole punch, which can be purchased for as little as £2.
Two Rings are Adequate
The standard hole punch in the UK is a two-hole punch, which is even used for A4 sized paper. The center spacing is 8 cm. There are four-hole punches and binders available too, but they are not widely used, mostly for display albums. Two rings hold paper well enough. The only time paper can sag a little is when there are only a few sheets in a big binder without dividers. Thin card will hold the paper, and some of the larger binders (lever arch binders) have retaining clips to hold the paper firmly.
So the question arises, why more rings? This is particularly puzzling for small planners, which often have six to eight rings. Total overkill. There is only one reason for them, that is to tie the buyer into expensive refills or an expensive punch which will only make holes in the right place for that brand of planner. Not to mention the silly paper sizes.
Spiral and twin wire binding requires a greater number of holes/wires to make a firmer book. The same applies to the disc binding system, where just a few discs on a large book would make for a very floppy book. And yes, the even, 1 inch spaced discs allow for a mixture of paper sizes to go into one book.
Nevertheless, two rings are almost always perfectly adequate. Two hole punches are cheap, they are strong, they are available everywhere. With a little tweaking the two hole punch can also punch three or four holes easily. You may already have a two-hole punch. So lets look at your breakfast packaging.
A Milk Container and a Cereal Box
The rings, or rather, loops, are just thin strips of plastic with a wider piece at the end, cut from polyethylene milk containers (or washing-up liquid, or....), and sandwiched between two pieces of card, e.g. the card from a cereal box, with a third layer in the center as a spacer to stop the embedded plastic strip from bulging.
Paper is punched in the normal way, and then slit with scissors from the edge to the hole. Unlike the disc binding system, no material needs to be removed, as the cut only facilitates the loading and removing, and do not have to allow for the thickness of the material as in the center of the disks. With only two holes per sheet, this is quickly done. Also, the slit does not have to be exactly in the center, so no precision measurement. Snip, that's it.
You can snip a bunch all at once, they don't even have to line up exactly, so if the scissors slide a little, no matter. then just push the paper onto the ring, and allow the flaps to close up again inside the loop. To remove the paper, just peel away from the rings. Although the paper can be slipped on or removed with great ease (even a bunch at once), it is held quite securely on the loops.
The number of loops can vary according to personal preference. It is easy enough to make holes at 4 cm spacing with a two-hole punch by lining up one hole with the center marker. A single hole punch with a cardboard template can also make holes in any position you choose. Want to bind a hipsterPDA with just one loop? Easy. The plastic loop will also sit more comfortable in the pocket. The loops themselves can be made in different sizes to accommodate varying thicknesses of paper.
So what is the downside of this binding system?
It does take a little work to make the binding mechanism, but not a lot. I would say, that in the long-run the work involved is less than with the disc system, as the operation is quicker with only two rings, and easier moving, and that does not take into consideration the time you have to work to pay for the expensive disc system. The other downside is a slightly thick backing board (three layers of card), but even this can be an advantage, as it gives a firm support for writing. And lastly, the cut edge of the plastic is perhaps not quite as smooth as the disc, but does allow the paper to be turned without snagging. Perhaps a warm iron over the edge will give it a nice round surface?
Click thumbnails to enlarge, click popup to close
Loops being cut from milk container. I tried to cut the first one with firm pressure (craft knife), but the plastic is very slippery, and the cut soon wobbled off-line. The other cuts worked better when I held the ruler down firmly, but used a very light cut first time to score the plastic, and made a few more cuts. The wider ends would actually work better if square, and be easier to cut. The strips are 4mm wide, wide enough for a secure hold, and narrow enough to allow some slack. The length of the strip is the circumference of the desired ring.
Smoothing the edge
Bending the loop
Loops fed through spacer card and position marked
Spacer card and third layer ready for pasting. When pasting the last layer of card onto the spacer, the edge is best clamped with clothes pegs or craft clamps until the glue sets, as the rings will try to push the card layers apart.
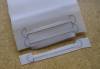
Completed binder back plate
Pushing on some paper
Loop arrangement
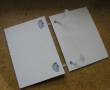
Lying flat
No sagging
For smaller rings, the holes need to be closer to the edge. I inserted a spacer strip (cardboard or, as here, magnetic rubber, will do, or a cable tie) into the hole punch, so that the edge of the paper butts against it. The distance from the hole to the edge of the paper should be just less than half the ring diameter to allow the pages to turn without rubbing against each other. In this photo the booklet is bound with wire rings.