Hand Built Home - Homesteading
Last update: 31 January 2005
House under construction, and workshop in the background.
Click image to enlarge, click popup to close
Impossible is a word reserved for those with no imagination.
Here you will find out about how I built the workshop, the house and other buildings.
Click thumbnails to enlarge, click popup to close
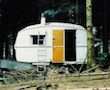
You have to start somewhere. The 12 foot caravan was winched and pulled into the woods by hand before the road was constructed. It took my then boyfriend and me several days, attracting some curious looks. It was home for the best part of four years, after spending the first two years after buying the land in a 17 foot railway goods wagon. Living in such a small space is a good way to learn how to make good use of space. It was quite cosy with a wood burning stove. The water tower gave me gravity fed water, even if I had to fill up the tank with a jerry can first. Water was carried from a spring on the side of the path. Ahh, the good old days.
1993
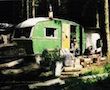
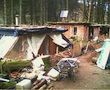
Its starting to look like home. There is now a pole shed behind the caravan (this is the same shed in which I later built the house), and a shed made of straw bales to the side.
approx. 1998
The foundation of the log cabin consists of concrete blocks, loosely placed with gaps on a thin levelling layer of sand. Only the topsoil (very thin) was removed, therefor the trench is barely an inch or two deep on the downhill side. The first timber, a 2" x4" sill is the only treated timber, and placed on a layer of plastic dpc. Into this sill I toe-nailed the corner logs and secured them temporarily with bracing timbers.
Next I nailed a board across the the top, and started filling in the corners with more logs, nailing through the board on top, and toe-nailing at the bottom. Once I had about 3 - 4 logs at each side of the corners, I nailed on a permanent timber, and continued filling in. The logs are on average 6-8" diameter, and are placed alternating top/tail. A 3" x 4" timber runs on the inside of the building about 18" above the ground (visible at the back), notched and nailed into every other log. This gives the building extra bracing, ties the logs together, and provides a ledge for the joists to suspend the floor well above the ground.
To reduce the humidity from ground evaporation, I covered the soil under the floor with polythene. The gaps between the logs are only filled from the floor level up to allow through ventilation under the floor. The top plank was reinforced with round timbers before the roof went on.
1998
Workshop wall construction. The top beams were later reinforced with round poles. The building measures about 8 feet x 16 feet without the lean-to sheds, which were added later.
1998
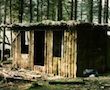
The logs have been chinked with a mixture of clay dug up on the site, some sand, moss, and lime. The roof is corrugated tin with a covering of spoilt straw, and will hopefully be upgraded this year to a more substantial turf roof, along with extra bracing. A simple lean-to shed at the rear is finished.
1999

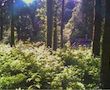
Approaching the site from the main path through the wood.
approx. 2000
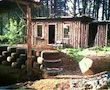
House seen from the main path
2003
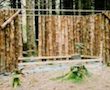
The retaining wall made with earth filled tires.
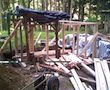
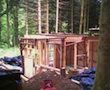
The frame of the house is going up inside the shed which was behind the caravan. Due to planning constraints (and mis-information) I tried to keep the original roof level, which meant having to dig down. Also, I built a 'room' within the original building.
The spoil forms a berm behind the building. I made a retaining wall with car tires in the fashion of an Earthship, and piled earth bags on top to increase the shelter wall. Note the posts of the shed extended down with a short post tied to it, which I had to do whilst digging carefully around it.
The pit was dug just bigger than the footprint of house (11' x 11'), and later enlarged. It is about 2' deep at lower end, and 3' at the top, as the ground slopes a bit. The pit is now between 2-4 feet larger than the house on three sides, and a bit more on the lower end, which now has a porch area. Digging the pit was one of the biggest jobs, as the hard clay ground is very stony, and there were several tree stumps with a network of large roots to remove. I had to whittle away at it with a brick hammer and a small shovel.
2001
The shed is being dismantled as the stud frame is going up, as it was too dangerous to keep, and was very awkward to work under.
2001
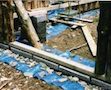
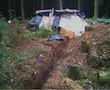
The drain trench around the pit is back-filled with stone and earth. The shuttering to separate the two vertical layers can be seen sticking out. I had a mini digger in to dig the trench, as it had to go down over 3 feet, and kept as narrow as possible, which would have been far too tedious to dig by hand in such a confined space.
To save on stone I back-filled only a thin vertical layer with it, enough to drain water downward. At the bottom of the trench I laid stone the full width, a perforated pipe, and surrounded it with more stone. Above that the stone layer is only about 3-4" wide. Several sections of shuttering were moved along as I filled the trench, working from the center outward.
The trench is about 3 feet away from the pit, and was an afterthought, as the water table rises to the surface after prolonged rain, and although it would not fill the pit because there is a drain downhill, it did mean a thin layer of running water passing through the pit.
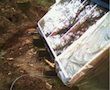
The building is raised on nine low block piers, simply a concrete block lying on the ground, and shimmed up on the lower end, as the pit floor is slightly sloped to aid drainage. There is a layer of plastic dpc on top of the blocks, and the pit floor is covered in polythene to stop excessive evaporation dampness under the building.
2002
Here the trench leading to surface downhill can be seen, as well as the end of the trench surrounding the pit from behind the house, which does not enter the drain-off trench at the same level as the other end, which is slightly closer to the house. This was due to access difficulties, but it works just as well being asymmetrical.
The mini digger also enlarged the drain-off trench which I dug previously by hand, on a rainy day, as the water level was rising inside the pit..... But that is another story....
2002
The trench in front of the house. The sloping glass wall is another idea borrowed from the Earthship concept. However, the way I tried to adapt it is not satisfactory, and I will be changing it.
The pit is more-or-less covered over all round and does not allow rain to enter, but is not totally isolated from the elements, which causes condensation problems on the inside of the glass, and the space is difficult to use, due to its small size and sloping walls.
2002
Tips and Tricks
Preventing moisture rot in timber without chemicals:
- non-exposure
- drainage - observing grain direction
- ventilation
Wrap the edges of tarpaulins and plastic sheeting around a thin batten (e.g. louver from old window blind) when nailing them to a frame to prevent ripping in stormy weather. Nail through batten. Alternatively, attach with elasticated straps to remove some of the force of the wind.
Related Articles

Free creativity guide to help you solve problems and design anything.

Tips and tricks for living in a small space.